CoinRemitter Checkout for Magento 2
CoinRemitter’s crypto payment plugin for Magento lets businesses accept cryptocurrency payments on their Magento-based website.
Magento 2.4.8
Cryptocurrency Payment Gateway
Magento is an open-source eCommerce platform that serves as a flexible shopping cart system, as well as control over the look, content, and functionality of the online store. Magento provides a wide range of features, including inventory management, SEO, and multi-store support, making it a popular choice for small to large businesses.
Magento’s worldwide usability made us provide a worthy Magento commerce extension powered by CoinRemitter. With the help of this plugin, merchants can get the benefit of direct crypto payments on their Magento websites. The process shown below will help you integrate CoinRemitter into your Magento website:
Requirements
To perform CoinRemitter-Magento integration, you must have Magento version 2.x.
You must have created a CoinRemitter account. If you don’t have one, then you must sign up.
Make sure that you have installed Elastic Search because it is mandatory for performing CoinRemitter-powered Magento payment integration.
Plugin Installation Guide
Install from Magento marketplace
You can visit the Magento marketplace to install the CoinRemitter plugin. You can follow some easy steps to install it.
First, log into your server, go to your magento root directory, and download CoinRemitter's Magento plugin v1.1.1 using this command.
Composer require coinremitter/magento2:v1.1.1
Here, v1.1.1 indicates the latest CoinRemitter plugin version at the moment. Please check for the latest version before running this command.
You’ll be asked to enter the username & password while installing the plugin.
You can get the public key and private key from ‘access keys’ under ‘my profile’ on the Magento marketplace.
Enter the public key for the username and the private key for the password.
Install from GitHub
You can download the zip file of the CoinRemitter Magento commerce extension from GitHub.
Login to your server and unzip the file and rename it to ‘Checkout’.
You’ll find a folder named ‘code’ situated in the ‘app’ folder.
In case of the absence of the folder, create a folder in the ‘app’ folder with the name 'code'. Now, create a 'Coinremitter' folder in the 'code' folder, Then move the ‘Checkout’ folder into the 'coinremitter' folder.
After downloading the plugin
In order to proceed further, please run the following commands:
php bin/magento setup:upgrade
php bin/magento setup:di:compile
php bin/magento setup:static-content:deploy -f
php bin/magento cache:flush
You can now enable and adjust a bit of stuff in the CoinRemitter plugin by implementing these steps:
- Store >
- Configuration >
- Sales >
- Payments Methods
Configuration of Plugin
On the configuration page, scroll down and go straight to the bottom of the page, where you will find the CoinRemitter Crypto Payment box along with a few other boxes that you have filled out with your specific needs.
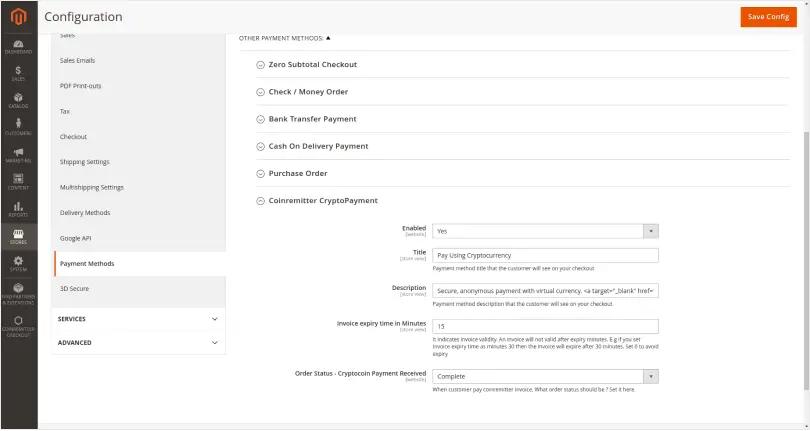
Make sure it is YES selected in "Enabled" Option. However, you can change the Title name according to your preferences.
Place a valid time in the Invoice expiry time in Minutes box.
Be sure when selecting the Order Status option. Because it will appear on your website when the order status is displayed to the customer.
To save this setting, you'll find the “Save Config” button at the top right corner of the page.
Add a CoinRemitter Wallet
Now click on "CoinRemitter Checkout" menu from side bar, it will open sub menu then click on wallet option
- CoinRemitter Checkout >
- Wallet
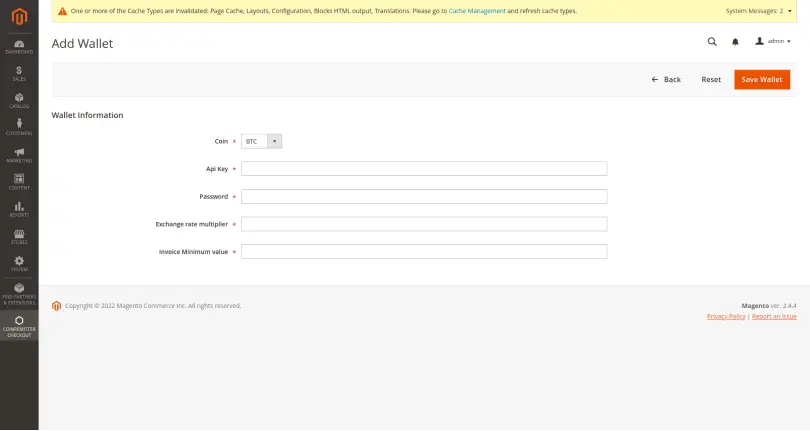
You’ll find the “Add wallet” option at the top left corner of the page.
Now go to the CoinRemitter website and log into your dashboard, choose a wallet, and get the API key.
In case you experience some trouble getting the API key then Click Here to get the explanation.
Head back to the CoinRemitter page of Magento
Paste the API key into the box and fill in the Password in the second box.
Don’t forget to add the exchange rate multiplier.
The default price multiplier is set to 1. For instance, if you set it to 1.10, then prices at checkout page will be increased by 10%, and you can set it to 0.95 in this text box for a 5% discount.
Setting the minimum invoice limit is necessary, The generated invoice won’t be less than the minimum invoice limit. Enter this amount in default fiat currency of your website.
Click save wallet on the top right of the page.
How to Make a Payment
Once a customer fills in the mandatory details and orders a product, the system will take them to the payment page.
They will click the Pay Using Cryptocurrency option.
They can select one of your coin wallets to pay for the product and click place order.

At the very next moment, the system will automatically generate an invoice, which will appear on the customer’s screen.

Customers can copy the payment address from the generated invoice and pay the exact amount to it. Once the transfer takes place, it requires 3 confirmations to mark the order paid. It will automatically redirect customers to the order summary page once payment is confirmed on the blockchain.

Congratulations! You have now successfully paid for your product.
Check Order Details
Go to your admin panel menu and click on Sales. Once the sidebar gets opened, click order.
Once you reach the order page, you will see a list of your orders. Select one of these orders. Make sure that the order is paid using CoinRemitter’s payment option.
Click view from the order, and you’ll find a newly opened tab on your screen.
On the left side menu, you will see the Payment Details (CoinRemitter) tab. Click it.
You will get to see the payment details there.

Over NaN merchants are using CoinRemitter
Join them now